")


")
Hey friends!
So, I’ve shared many times that when we moved into our current home, we had to do any and all remodeling on a tight budget. I knew the look I wanted, but….we certainly did NOT have the funds to go all in all the way. Maybe someday, but not right in this season. So! Instead, I researched and carried out quite a few inexpensive farmhouse hacks to create the look that I wanted but on a serious budget. Some of these are not forever-solutions, but you know what? I was tired of waiting until I could afford EVERY single EXPENSIVE thing that I’d dreamed up. I wanted my home to feel a certain way, and, while budgets were a bit tight, I found a way to make it happen! In this series, I’ll show you some of our tricky little farmhouse hacks to get the look…but on a dime.
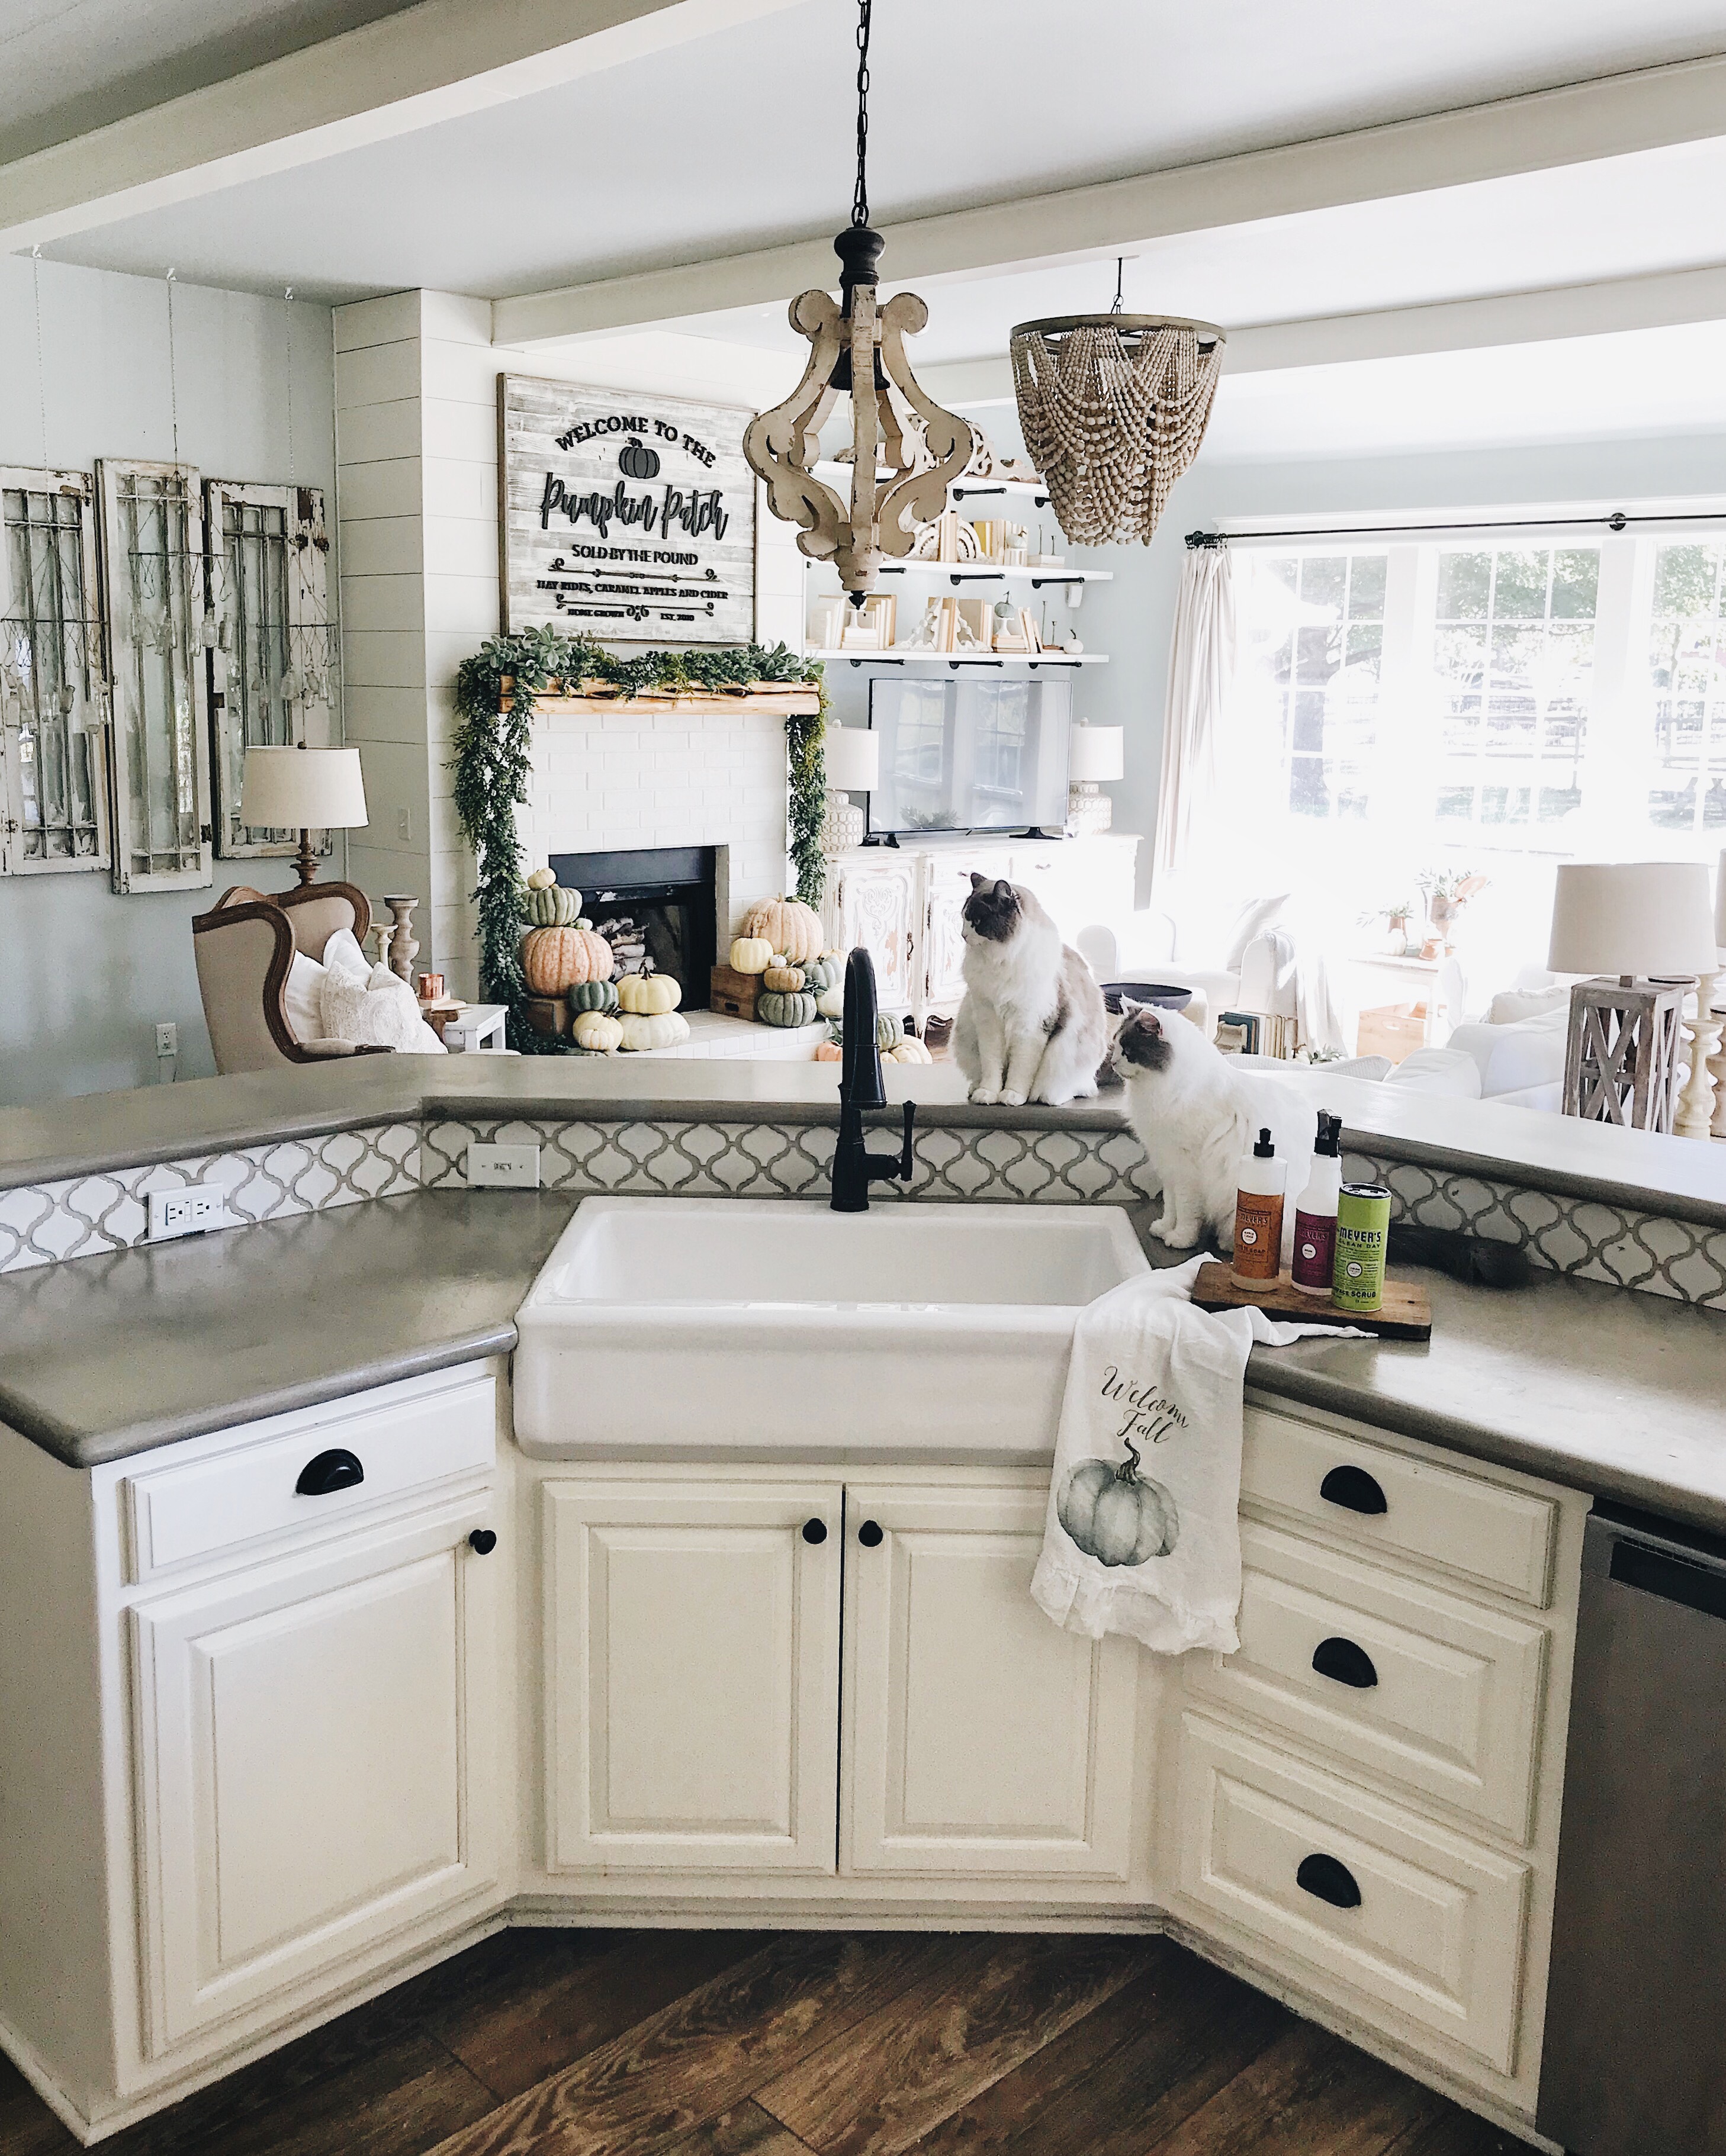
DIY concrete countertops

When we bought the house, it came with a kitchen covered in Corian counters, and honestly, they weren’t terrible. I do interiors for a living, and that is how I sort of express my “art” or my creative soul, if you will, and, while not absolutely horrifying, I will say that brown splotchy Corian countertops were not really speaking my soul language, if you get my drift. 😏 Someday, I’d love to have Quartz countertops, but at the time, those dreams were just a bit too pricey for our cash-only philosophy on home improvements. Enter DIY concrete countertops!
Poured concrete countertops would have been a lovely choice, too, however even that was beyond our tiny budget…and I was tired of waiting. Again, this line of work is what I dream and obsess about all the time….so between the choices of waiting for a couple of years to save up the cash money to remodel the kitchen of my dreams OR find a way to make it work with the budget we had at the time…? I went with option B. 😉 And I’m so glad I did! It was very very inexpensive, and, with a little elbow grease (what even is that…? Ew.), my hubs and I knocked out a total kitchen transformation in about five days. In this post, I’ll chat about our sink and our countertops and give you the tips and tricks to get the farmhouse kitchen look on a budget!
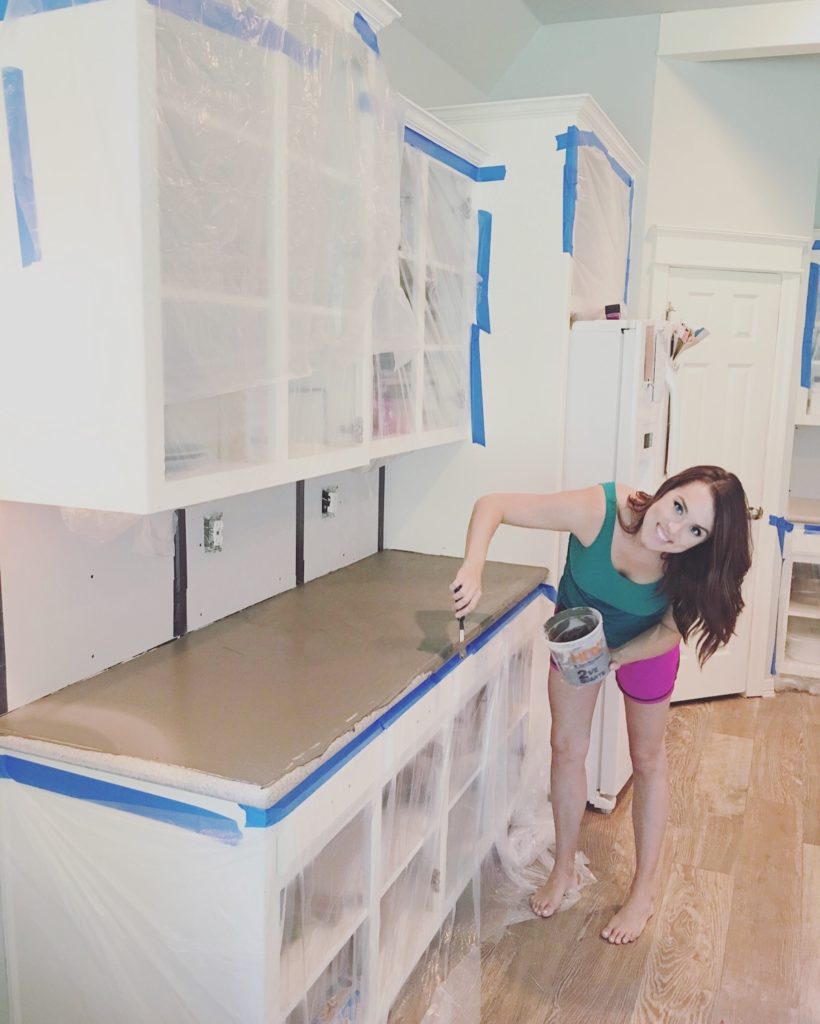 (Had to tape up our exposed cabinet interiors, bc we were also repainting them…and we didn’t want the concrete dust getting all up in our stuff. )
Firm believer in not reinventing the wheel, so I’ll just tell you that we used the DIY concrete countertop tutorial found on Young House Love’s blog…and our house loved it! 😉 Lots of helpful tips, tricks and ideas, plus they lay out problems they solved on the fly, source products and then you can check the bottom of the post for updates after living with the countertops for awhile! Click [HERE] to check out the tutorial we used! It’s as easy as putting icing on a cake. Well…maybe a bit more involved, but that’s the basic concept: you just “ice” your current countertops with concrete! How cool is that?!
Really the only major difference in our methods and products was that we ended up using Minwax Polycrilic in a matte finish [HERE] to seal the countertops. A tip: seal, seal and then seal some more. We made two errors while DIY-ing these countertops, and this was one of them. We didn’t add enough thin coats of sealer around the “wet” areas, like the sink, stove and near the dishwasher. You can tell your concrete counters aren’t sealed fully if standing water eventually seeps beneath the seal, causing the concrete to darken like when it was mixed fresh. Dry concrete is ashy and lighter in color, so when you see dark spots, you know you need to let them dry completely and then add more sealer, sanding lightly between coats.
But guess what? The great thing about DIY concrete countertops is that if you mess up, you can simply sand down, slop a bit more concrete on that spot, let it dry, sand it and seal it. Basically, you can spot treat your countertops (again, with a wee bit o’ elbow greasiness), which is more than can be said for stains on granite or scratches on other types of expensive surfaces. It honestly feels fool-proof for this reason!
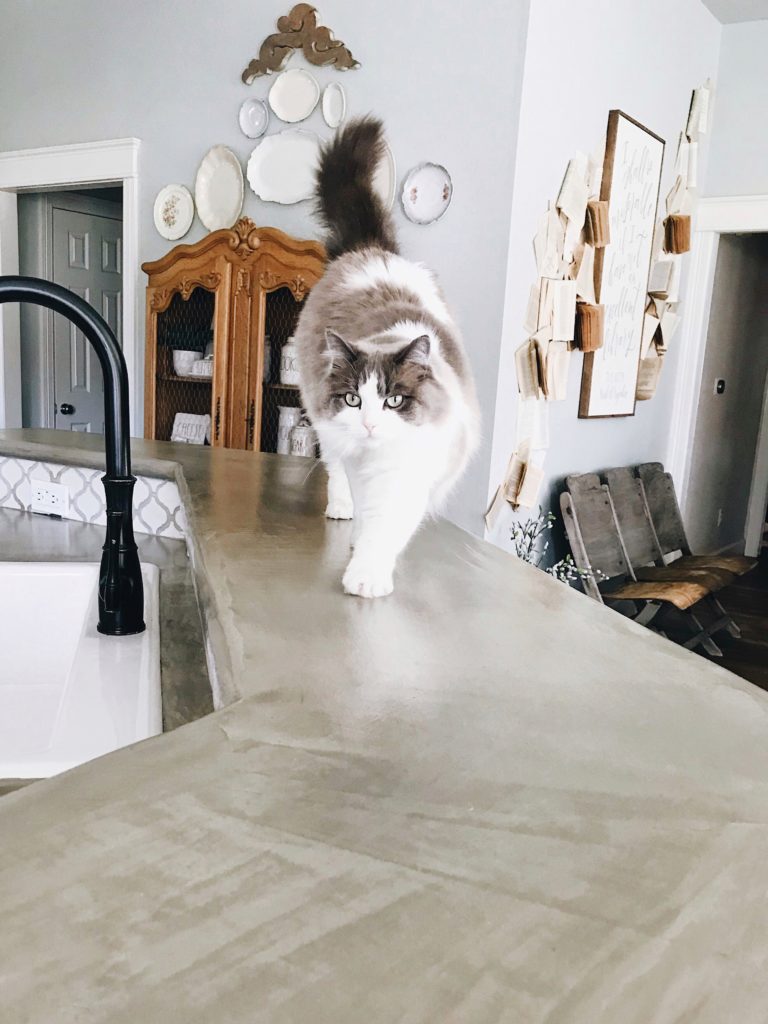
Love, love, love the natural patterns from the application of the wet concrete, and no section of the countertop is the same as the next. It’s perfectly imperfect, and that’s probably my second favorite aspect of this project! (The first being the price: we redid alllllll of those countertops that you see here for about $150. I mean, COME ON NOW. 🙌🏻)
The second error we made while DIY-ing our counters is pictured below: we got a little wild and crazy on the corners, and you can see a tiny bit of the old Corian peeking through after some too-vigorous sanding happened between concrete coats. All we have to do is slap a little bit more wet concrete on these, let dry, sand down and seal…so no biggie! Just a word of caution for you on edges and corners: go a little lighter on the sanding pressure.

A few more thoughts on the concrete ‘tops:
-It is DUSTY and a lot of arm work for about two days. Biggest cons of the whole thing. Be prepared for lots of dust in and around the area in which you are working. You have to let the concrete dry between coats (we did three layers total), and you have to sand between each layer. We’d just run the vacuum after each layer, and the dust was contained mostly to the kitchen and a little beyond. Nothing insane, but do be prepared for construction dust and tired arms.
-We preferred sanding by hand to the electric sander. The electric was almost too jerky and rough, and it ended up gouging out areas that we’d then have to go back and patch. We also preferred hand-sanding to get a perfect curve around the edge of our rounded Corian counters.
-Use thin coats of sealer at the end once everything is sanded, cleaned and totally dry. Do NOT put anything on your counters between the dry concrete phase and sealing them. Oils, lotions, water drops, etc…these will all show up under your sealer, so just BE GONE from the kitchen until you have time to seal ‘er up! Thin coats of sealer and lots of ’em, especially around wet areas.
-Lots of extra tips and tricks on the Young House Living blog, so check [HERE] if you are interested in the whole shebang!!
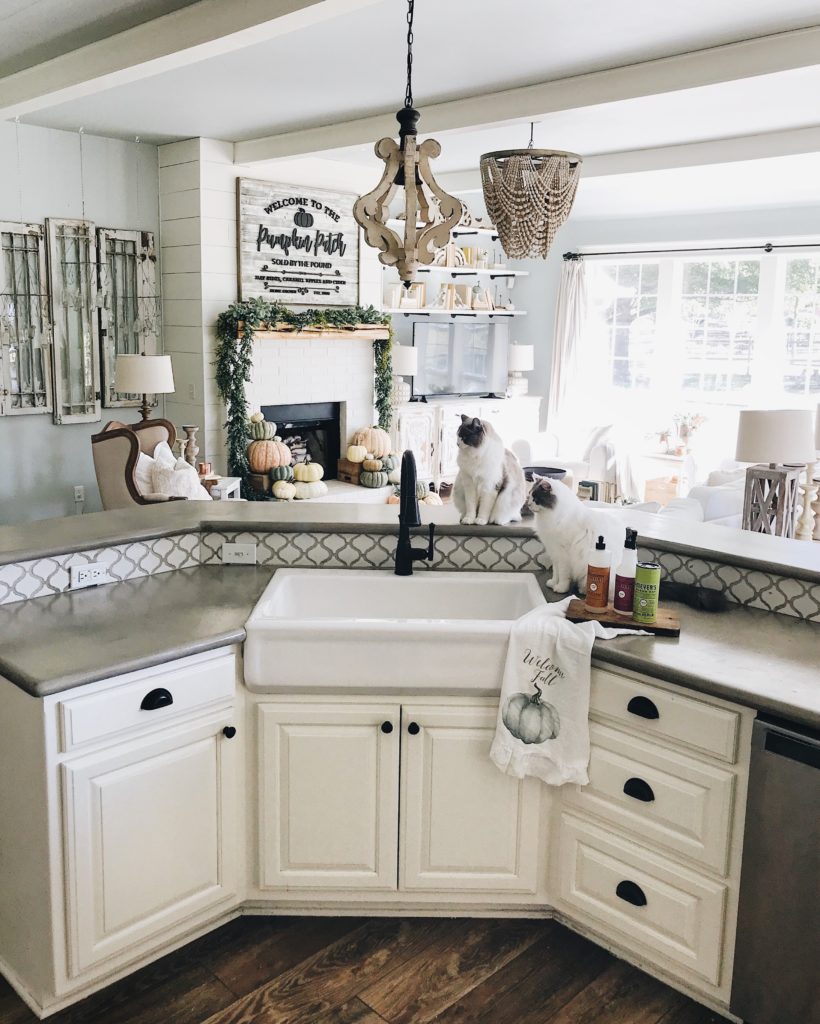
Faux Farmhouse Sink
Another element of the kitchen I’d been dreaming of was a big ol’ farmhouse apron sink, big enough to bathe my babies in and then some. 😉 Budget did not allow for a real deal cast iron sink in the size and look we wanted, plus for practicality (ie. I didn’t want to rip out cabinets or countertops to get an under-mount), we went with a less expensive drop-in option with a faux apron front from Lyons Industries [HERE]. It’s a fiberglass faux farmhouse apron sink with a high gloss acrylic finish, and I’m telling you, it looks real deal. It’s held up to EVERYTHING we’ve inflicted upon it for the past couple years (baby bums, pans being plopped down too hard, painting project leftovers, all kinds of abuses!), and not a scratch in sight.
For the price and the amazing ease of installation, I can’t recommend it enough if you go into it knowing that it isn’t the hardcore cast iron version. It’s a great budget-friendly substitute for now! (Be sure to seal edges with clear caulk VERY LIBERALLY if you are also doing the concrete counters. We did not seal nearly enough, and that is the only area of noticeable damage to our countertops: about a 1/4 inch area surrounding the sink has darkened. All we have to do to fix is sand, reapply concrete to just that small area, let dry, sand and seal up extra! Not a big deal, but just a side note.)
Hopefully this gives you a few tips and tricks if you’re in the mood to remodel on a tight budget, and I’ll be back later on to answer any follow up questions you’d like to leave in the comments regarding these two farmhouse hacks! Thanks for stopping by, buddies!
❤️Erin


Wow! I love this idea Erin! Brilliant!
Hey Abbi, thank you!
I just want to say I am LOVING this series. We are currently giving our tiny little home some updates and are also on a budget. I am loving these tips and tricks, my husband maybe not so much as its creating more projects haha!!! Looking forward to the rest of the things in the series!
Ha ha, sorry hubby! Tell him at least they are cheap, ha! 😉
Hi,
Do you have a special secret to cleaning your sink? I have a sink similar to this and find getting marks and things off is impossible!!
My secret is in the pic…Mrs. Meyers scrub!!
I’m looking at the sink the you linked. Love it! I notice that you have one hole in your sink and it’s a four hole sink. Do you know if it comes from n a one hole sink? I reall love it!
Love these hacks !!! Did you also get your cabinets repainted ? I love all the details you have in your home! Looks like a happy family lives there ❤️
Thank you for being so generous in sharing your knowledge!!! I would love to know how you did your shiplap on your island! Particularly those funky corners! Do you know what finishing piece/ moulding you used! My island seems to have similar angles and I am super stumped on what to do there!!!
Again, thank you!!❤️
Love, love, love~So beautiful and amazing hacks🙌🏻❣️
I’m getting ready to paint cabinets and concrete my counters too and now I’m so excited!!!
What is your cabinet paint color?
This looks gorgeous! Thanks for sharing your tips! I think it is amazing to have a home that you feel is your true home. Raising littles in it is just the icing on the cake. We currently are in dire need of a kitchen redo- green laminate countertops and all- one day! Thanks!
Thank you so much for sharing!!!! Loving your kitchen and blog 💕💕💕! So inspiring!!
How did you cover the extra faucet holes on the sink. The sink pictured through the link shows 4 holes. How did you overcome this obstacle?
Love these ideas!! Do you think that DIY counter tops would work on tile counter tops?
Great tips! Quick question though…was your existing sink overnount? If not, how did you get the old under mount sink out prior to putting the new sink in, without ruining the existing counters?
Thanks so much for posting this!! Closing on our new (1957) house is next month and everything is original to the house!! So this version of concrete countertops is definitely something we will be able to afford & something we wanted to do but figured it wouldn’t fit the budget either. Thanks for sharing!!
Been wanting to redo our counters for a while and would never have thought of this, this is so cool!! Does the sealer prevent stains and scratches? Would you be able to cut on it or do you still need a cutting board? We don’t have as much counter space so maybe the hubby would be down for another project 😜 Also we have a double sink but I’m desperately wanting to switch to this sink. Was yours previously one sided or two sided? Not sure how pipes and all that work. Thanks for sharing!!
They look amazing! We did ours this summer and love love love them, however we didn’t seal them nearly enough so I have to redo them. I’m wondering, however, is the Minwax you used food safe? I’ve seen several different types of sealers and I’m not seeing anything about Minwax.
Hey Erin, quick question about the faux farmhouse sink. What was there before you put it in? Was it the double sink? I’m just wondering about the faucets lining up. Was that an issue?
Erin, I totally did not realize they even made such sinks! I have been thinking yours was a true farmhouse sink all along. Love, love, love! I have been following your blog for a few months now and I am obsessed. I have never been into reading blogs until I ran across yours, love it. The countertops look amazing too, totally saving these ideas for when purchase our forever home. Also, loving the tile backsplash, did you and your hubs install this as well?
I <3 this! I am so glad I found you! Thank you for the amazing sharing that you are doing. 🙂
So curious what your backsplash is?! I’m really loving it
Hi Erin,
What color are your cabinets? We are researching affordable ways to remodel our 1967 kitchen.
Thanks!
Erin Schmid
Where did you get your backsplash?😊
What is your kitchen faucet brand and style? Do you recommend it? I’m in the market and really like the look of yours!
Hi I luv your sink idea!, I click on the lynk but it says that it has been discontinue do you know where else could I find it?, I have search with no luck!
Hi I love your kitchen. What color are your cabinets?
You just can’t beat a good hack! Especially when it turns out as gorgeous as your countertops and sink!
Hi Erin – Erin, here! 🙂 In the tutorial it says to rough the surface of your counter tops first, before applying your first layer of cement. We have these terrible black granite tile counter tops. I’m wondering 1. How to rough them, they seem impossible to harm, and 2. If that step was missed would the concrete still adhere? How did you rough your original counters?
Thank you
So cool!! I had no idea you could frost an existing countertop to create a faux concrete counter top!!! Thanks for sharing Erin!! So cool! That sink is discontinued now 😭
Thanks for teaching me! Never heard of painted concrete! Looks totally fantastic
Hi – I am getting ready to give this a try! I read that you have to reseal your counters every few months otherwise acidic things like lemon will stain the concrete. Have you experienced this at all? Thank you for sharing!
Wow 🙂
This is an incredible collection of ideas!
Waiting for more helpful pieces.
You would amazing to read a similar one here-
bestfarmhousesink blog
Just discovered your blog and love this idea!
Thank you for sharing!
I’m trying to find a sink like the one you have on this post but it saying it’s discontinued. Do you know of another?
Thanks,
Jessica
Beautiful countertops btw.
[…] cottonstem.com […]
[…] kitchen. This sink blends easily with other colors in this kitchen because it has a neutral color. White apron sink from cottonstem If you want to have an apron sink that has good quality, then stainless steel is an […]
[…] Source […]
Really superb! I am so impressed by your effort. The way you did the work is outstanding. Thanks for sharing.