")


")

Hey buddies!
Okay, so if you follow me over on Instagram [HERE], you may have caught my IG stories on the day I walked through some of my home decor photography tips! If not, I took some screen shots of the story so that I could round up the tips on the ol’ bloggy.
Let it be known that I am SO NOT a photographer…seriously. Like, for serious. 🖐🏼 These are just some tips I’ve picked up along the way, mostly from trial and error, researching online or asking friends! I’ll show you the quick phone-video screen shots from my story, and then at the end, I’ll show you how the photos actually turned out after employing these tips!
The other thing to note: not all tips work in all homes. For instance, it would be impossible to tell you THIS EXACT SETTING/POSITION will work in EVERY single home, because all our homes are different: lighting, colors, window positions, etc. I learned so very much through trial and error, and I suggest the same for you if you are looking to improve your home photography skrillz! Here are a few (pretty general) tips on lighting and positioning that i do each and every time though….hope they help!
POSITIONING

1. The Corner Method: Take a few shots from each corner of your space.
In whatever space you are shooting, move from corner to corner, placing your back in the corner and facing outward, and snap a few pics. 📸 This way, you’ll be sure to hit every view of your space, and then you can go back later and choose the views that you love the most and want to show off! Sometimes I’ll stumble onto a view of one of my rooms that I’d never have noticed if I hadn’t moved into the corner of that room and faced outward, plus this method ensures you don’t miss an angle during your batch photo session. 🙌🏻

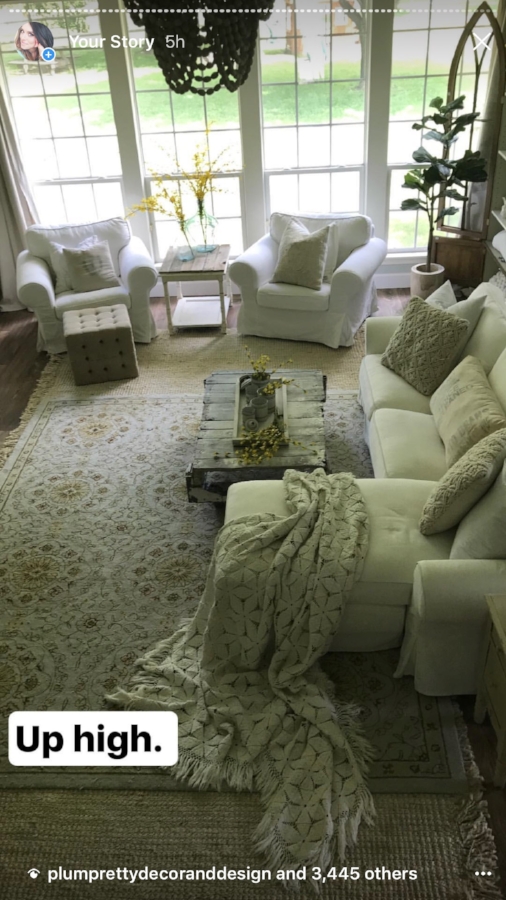
2. Get up high!
Another tip for expanding your photography repertoire is to get up high and shoot at a new angle! You can show off a whole different view of your space just by climbing up a few rungs on your ladder, plus this view helps better showcase things like your new rug or flooring, a centerpiece on your table, or the overall layout of your room.

I love climbing up on things (ladder, kitchen counters, etc) to see my space from a whole new vantage point, and it helps me bank even more useable photos during batch shooting day!

3. Get down low.
Ha ha, if you caught my stories that day, you’ll get that last part…😏 (Kept hitting my butt on the same cabinet multiple times….like a cray.) Anyway! Another angle to try is down low on the ground shooting straight out across the room or tilted up a bit. You can really show off a new perspective on your home decor and furniture this way, and it’s certainly a striking image and sort of out of the box when captured from this angle. Give it a try!
One more note….tips two and three can be combined with tip number one! Shoot from all corners up high, at eye level and then down low for a serious bank of batch photos ready to use!


There ya have it! Three easy ideas to build up photos to use on your blog, Instagram, Pinterest, wherevs! I hope this was even just a tiny bit helpful to you, and if you’d like to see more tips and tricks posts in the future, please let me know in the comments below! I’d love to hear from ya!
💗Erin


Love the up high shots. Such a neat view of your room and I’ll have to give that a try with y own space next time!
Thanks, Tamara! I hope it works for ya!
I’m so excited I found you on Instagram! I just launched my blog a month ago and am new to everything. I don’t know why I didn’t think about taking pictures from every corner of the room?! Great idea! For some reason I seem to do 2 (which now I know is 2 too few 😉😂). Thanks for the great tips! (Side note: I went to Target to try and find those Market bags and mine didn’t have anything! And no empty spots either where they would have been. Not a big deal, but funniness is: I had told my husband I had seen them on your stories (I think that’s the right term- showing my newbie Instagram self here 🙄). When we couldn’t find it he said "how weird! Didn’t you say that lady from "cotton mouth" found them a couple days ago? (😂😂now THAT would be a different kind of instagram feed! 😳😂
~Morgan
@mypeartreehome
Cotton Mouth…hahahaha!! Oh man, that made me laugh!! And thanks for checking out the blog, Morgan!
Never thought much about the down low photos. I will have to give that a try soon. Love your blog!
Hey Sonya, thanks for the feedback and for reading!
Thank you for these sweet photo tips here Erin, I’ve climbed up on a step stool before, but haven’t tried a taller ladder yet for a different prospective view. Have been using garage sale found tripod lately for a steadier stable pic though. All the best!!! Sherrie
That’s a good tip, too! Thanks, Sherrie!
Thank you!
Thanks so much for these tips Erin! What kind of camera do you use? I have a fancy one but don’t really have a clue how to use it!
I use a Canon Rebel DSLR half the time and then just my iPhone 7 Plus the other half!
I love your photos. They always turn out so good! Any advice? My photos always look so blan. Any app to edit them or?